For someone just starting out, here's the supply list I recommend.
- Sassy Salutations Stamp Set - This stamp set gives you a starting point to create cute cards for a variety of occasions.
- Designer Series Paper Stack
- Coordinating Cardstock Pack - The Stampin' Up 2015-2016 catalog has made this even easier by creating coordinating cardstock packs that match the colors in the Designer Series Paper. There's no thought required!
- Black Ink Pad - I recommend StazOn Ink because it stamps on EVERYTHING and doesn't smudge, but there are several good options out there
- Adhesive - I love Stampin' Up's SNAIL adhesive, but use what you are comfortable with
- Paper Trimmer/Scoring tool
 This is a project I often recommend. It can be a great starting project and it requires only the supplies listed above. It can be adapted to any occasion and as your comfort with stamping and supplies grow there are countless ways you can use this basic layout to step it up.
- Stamp Set - Sassy Salutations
- Bohemian Designer Series Paper
- Bohemian Cardstock Pack
- StazOn Jet Black
- SNAIL Adhesive

This basic supply list should be enough to create up to 48 cards with confidence!
Instructions:
Step 1: Create the Card Base
- Cut a 8.5" x 11" cardstock in half on the long edge. (Cut will be at 5.5 inches).
- Rotate the cut cardstock and score in half along the new long edge at 4.25 inches.
- Fold in half. You can use a butter knife or bone folder along the fold to create a nice crisp edge.
Step 2: Cut your designer series paper.
- Select three different patterns of cardstock.
- Cut these to the dimensions below:
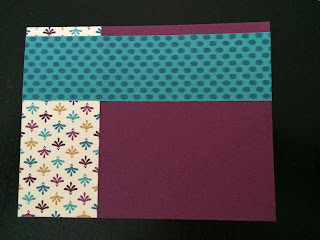
- Paper 1 - 1.75 inches by 4.25 inches. This will be the cardstock on the left.
- Paper 2 - 1.5 inches by 5.5 inches. This will be the wider paper on the top.
- Paper 3 - 0.75 inches by 5.5 inches. This will be the narrow strip on the top.
Step 3: Attach designer paper to card base.
- Attach paper 1 along the left edge of your card base. Ensure that the fold is located at the top before attaching this piece.
- Attach paper 2 along the upper edge.
- Align paper 3 in the center of paper 2 and attach.
Step 4: Add your stamp
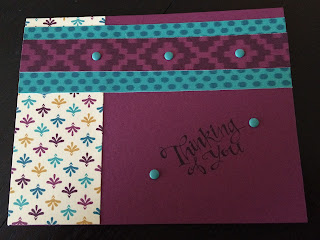
- Make sure not to rock the stamp. Press down firmly and lift.
That's it! Your card is ready to send! So easy!
But, if you want to step it up, here are a few ideas:
Attaching a few Candy Dots makes the colors and patterns pop!
This card uses the same paper set, but added a Vintage Faceted Designer Button and Bermuda Bay Thick Baker's Twine . I used my favorite Mini Glue Dots to attach the button.
Here's another card using the Cherry on Top Designer Series Paper Stack and Cherry on Top Cardstock Pack.
To step this one up, I pulled out my Amazing Birthday stamp set and 1-1/4" Circle Punch to add the birthday cake. This is a great way to think about adding new stamp sets to your collection and building up your supplies and skills!
Below I have listed the supplies I used with their ordering numbers to make it easy.
Basic Stampin' Supplies:
- Sassy Salutations Stamp Set (126707 Clear, 132070 Wood)
- Clear Block E (118484 - If using clear stamps)
- Bohemian Designer Series Paper (138446)
- Bohemian Cardstock Pack (139003)
- StazOn Jet Black (101406) or Archival Stampin’ Pad Basic Black (140931)
- SNAIL Adhesive (104332)
Supply Ideas to step it up:
- Candy Dots, Bright (130931)
- Vintage Faceted Designer Button (127555)
- Bermuda Bay Thick Baker's Twine (138413)
- Mini Glue Dots (103683)
- Cherry on Top Designer Series Paper Stack (138443)
- Cherry on Top Cardstock Pack (139002)
- Amazing Birthday Stamp Set (134228 Clear, 134225 Wood)
- 1-1/1" Circle Punch (119861)


